H2Micr0's FJ40 Shorty

Collapse
X
 
  • Filter
  • Time
  • Show
Clear All
new posts
  • H2Micr0
    Senior Member
    • Aug 2014
    • 140

    H2Micr0's FJ40 Shorty

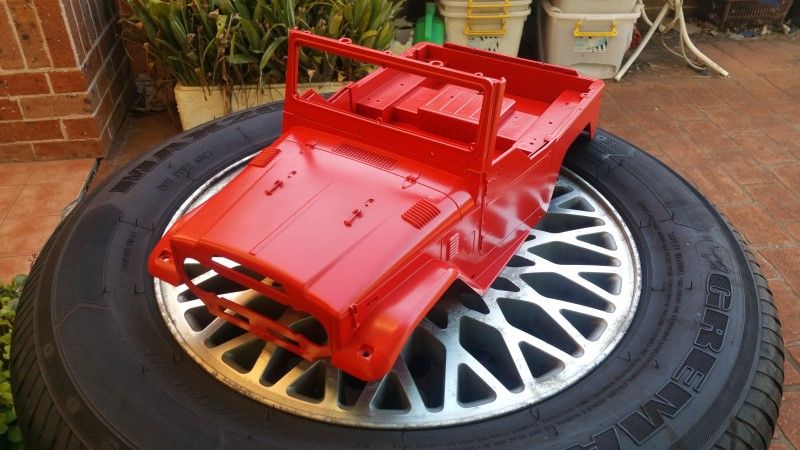
    Seeing as I am reinventing my Troopy using the FJ40 Hardbody from RC4WD, I decided I had better upgrade Shorty to match, so they will look right together out on the trails.


    I started a new thread to keep this new build separate. If you would like to read about the original FJ40 Shorty please CLICK HERE.


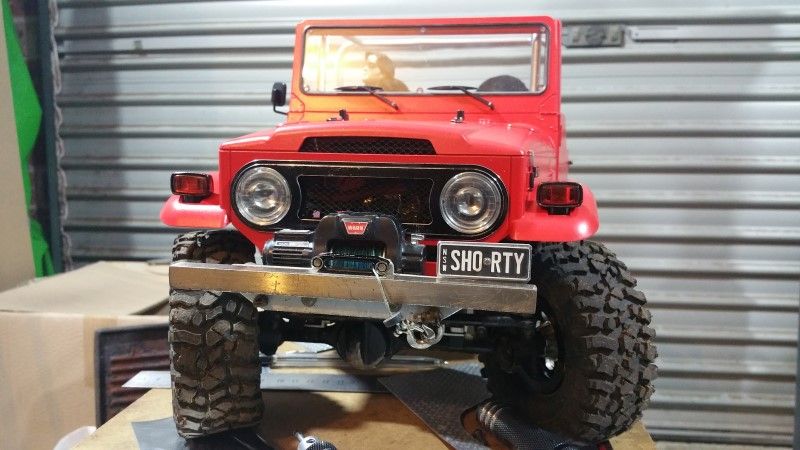
    A couple of pics of the original


    ************************************************** *****************************


    The loose plan is to retain as much 'FJ40 Shorty' as I can into this new version, while at the same time adding in some extra mods that I wished I could have done on the original.


    I will be using the same chassis and running gear which have performed very well for me over the last couple of years.


    Chassis - Gelande 1
    Transmission - RC4WD Planetary 19:1
    Transfer Case - RC4WD 2.18:1
    Motor - Holmes Hobby Pro 30t
    Diffs - Yota 2 with XVDs
    ESC - BR Mini with CC BEC on 3s


    If you haven't figured it out, this rig drives slow. REAL slow. You have to drive down every hill. The absolute control you have at low speed is really smooth and astonishing. But a slow walking pace is the best it can do. Still plenty quick enough for a trail run.


    Now, I KNEW straight away that a bigger tyre than is legal for class 1 would be needed to achieve the required 'trail ready' look and feel of the original. So I am building this to Class 1 Spec with the exception of the tyres, which are Pitbull Rockbeasts.


    After unpacking the new body the first thing to do obviously is stick it on the chassis and see how things line up, or not.


    I always knew it would need a wheelbase stretch, so that was a given. The front bar and winch look like they will work just fine for the moment.


    So first job is to push that wheel base out.


    This actually proved to be easier than I anticipated. I just unbolted the link mounts and moved them back to the last pair of holes.


    The shock towers are part of the chassis so can't be moved.


    Test fit again.


    And with the right tyres front and back.


    Wheel coverage is good.


    I don't know about you guys, but to me the rear wheel arch on this body is just plain wrong. The small arch makes a big tyre look huge, but the same tyre on the front looks just fine. Put a smaller tyre on the back and it looks just right, but appears tiny when on the front.


    When you compare it to real pics, it is too low and too narrow in my opinion, so I set about fixing it.


    l didn't get pics, but I pushed the wheelbase back a bit more and drilled another hole in the chassis to make that happen.


    I like it and that is what matters. This is a slightly modified trail rig with a link and coil conversion so the rear guard cut makes sense.


    And the other side waiting to be cut.


    Cheers
    H2Micr0
    Last edited by H2Micr0; 11-23-2017, 07:47 PM.
    sigpic

    Come and check out 'Trailworx Garage' on Facebook and Youtube
  • H2Micr0
    Senior Member
    • Aug 2014
    • 140

    #2
    In order to get the guards matching as best I can on both sides, I made a template and transferred the shape to the other side.


    A couple of minutes with the dremel and some file work later.


    Now, have any of you other FJ Gelande builders had this issue?


    The interior wheel tub is WAY to narrow and even with the skinny MTZ will rub at full compression.


    I will have to do something about that.


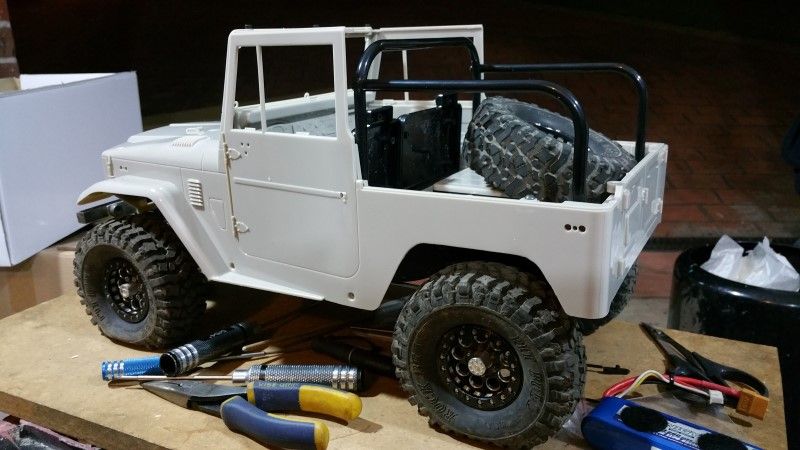
    I decided to bolt all the main bits onto the body to make sure everything was going to fit.


    And it didn't.


    The servo sits flush up against the back of the grill panel, so I had to get creative with the dremel again.


    The rest appears to be just fine.


    I will have to convert this to right hand drive as we drive on the correct side of the road here in Australia.


    Cheers
    H2Micr0
    Last edited by H2Micr0; 11-23-2017, 07:48 PM.
    sigpic

    Come and check out 'Trailworx Garage' on Facebook and Youtube

    Comment

    • H2Micr0
      Senior Member
      • Aug 2014
      • 140

      #3
      Very little actual progress has been made this week.


      I did manage to get the body sitting securely on the chassis, and was able to get a little test drive in on my rock pile.


      That is full flex, which I think is about right for a scale rig.


      I made a start on the rear bumper.


      Keeping it simple for this build.


      Using some 3 x 12mm flat alloy bar.


      The bar will hug the body closely and hang below by a couple of mm to protect the lower edge.


      I managed to get the bend on the other side right first go!!


      Am now thinking on where the bar should end in relation to the wheel arch.


      This was my first option. Can always shorten it from here. You can see the pencil mark where I am considering the next cut to be.


      Cheers
      H2Micr0
      Last edited by H2Micr0; 11-23-2017, 07:49 PM.
      sigpic

      Come and check out 'Trailworx Garage' on Facebook and Youtube

      Comment

      • H2Micr0
        Senior Member
        • Aug 2014
        • 140

        #4
        I have not made anymore progress with the rear bar yet.


        BUT!!!


        I did do some more work on the body.


        I originally wanted to cut the doors right out, and when I started researching this found this mod has been done quite a few times.


        I was actually lucky enough to have a close look at Tom Allen's (of RD4WD fame) FJ40 Geleande that he had modded this way too, so had a fair idea of how to go about it.


        I sat down to start getting it done, and thought I might just try something else first.


        And, I LIKE IT.


        This is the same treatment the original lexan version had. So it is fitting to keep that look. There are other good reasons to do it this way. The windscreen retains some structural support, and I keep the cool detail work on the hinges and can run the mirror. I also keep the option of running the hard top if I would like to.


        Then I got to work chopping the other parts to match.


        On this body there is the interior tub, then door cards that attach to that. So in the end 3 layers all had to be cut.


        As you can see I have quite the gap to cap off.


        And I had to sit it on the chassis for a look.


        Another quick mod I did was to push the track out by 4mm each side so the tyres protrude a little. This enhances the visual appearance of a 'tough' rig ready to handle the trail ahead. I have also installed single stage closed cell CI foams which have made a vast improvement.


        Cheers
        H2Micr0
        Last edited by H2Micr0; 11-23-2017, 07:50 PM.
        sigpic

        Come and check out 'Trailworx Garage' on Facebook and Youtube

        Comment

        • H2Micr0
          Senior Member
          • Aug 2014
          • 140

          #5
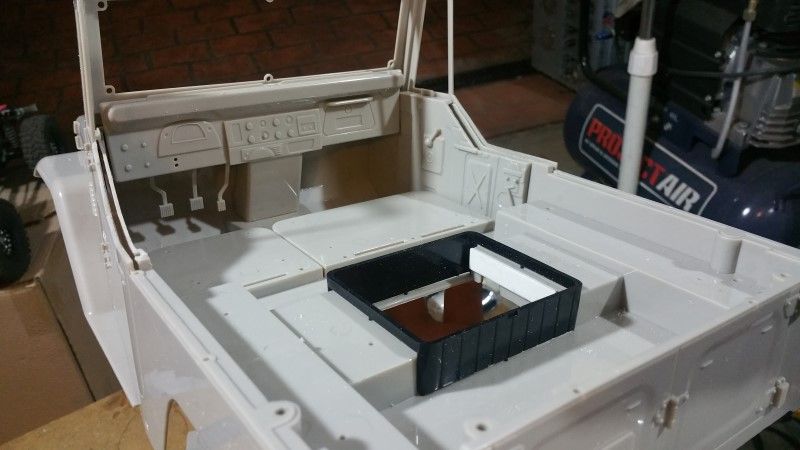
          Decided I had better finish up the doors on this.


          These gaps just have to go.


          After some careful consideration I elected to have the door cards still be removable. This will make them much easier to paint and detail later.


          First I carefully adjusted the cuts to all be as even as I could lining it all up so the outside door skin is slightly higher than the door card.


          Then I grabbed some scrap styrene and went to work.


          A bit of trimming and file work later and they fit very nicely.


          I still need to put some small caps on the door pillar behind the door cards.


          I have also decided this will stay left hand drive for now. It looks to be pretty complicated to cut and shut the dash, and probably have to replace the dash fascia completely. It is a job I can do later however when inspiration and motivation coincide.


          Cheers
          H2Micr0
          Trailworx Garage
          Last edited by H2Micr0; 11-23-2017, 07:50 PM.
          sigpic

          Come and check out 'Trailworx Garage' on Facebook and Youtube

          Comment

          • H2Micr0
            Senior Member
            • Aug 2014
            • 140

            #6
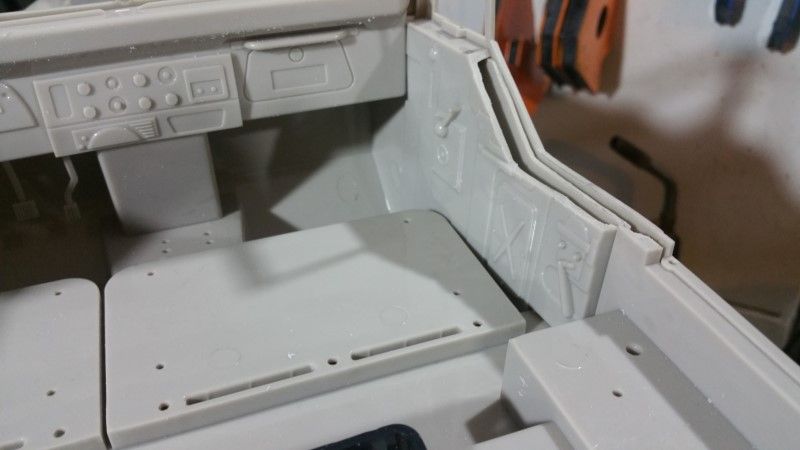
            While this is a bit hard to see, I have now joined the interior tub and body into one piece by gluing the two together.


            The windscreen frame has also been glued in place.


            Overall the body is now much stronger and has reduced twist and flex substantially.


            Prior to committing to this, I tested to ensure I could install and remove the dash and door cards.


            Cheers
            H2Micr0
            Trailworx Garage
            Last edited by H2Micr0; 11-23-2017, 07:52 PM.
            sigpic

            Come and check out 'Trailworx Garage' on Facebook and Youtube

            Comment

            • H2Micr0
              Senior Member
              • Aug 2014
              • 140

              #7
              After gluing the body and windscreen frame together it was really quite solid, so I cut the front quarter vent windows out for a cleaner look.


              Next up was to mount the body. I made sure I could remove and replace the battery without needing to take the body off first.


              Alloy angle lengths from Bunnings (local hardware chain).


              After a bit of chopping and filing, with a bit of drilling on the side, I had the front pair made up. These bold through the floor and do the chassis.


              The back mounts work in a similar way.


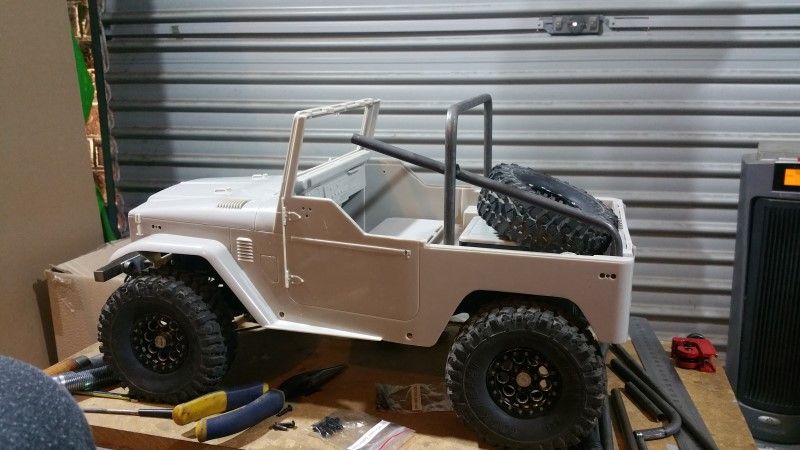
              With the body solidly mounted it was time to build the roll cage.


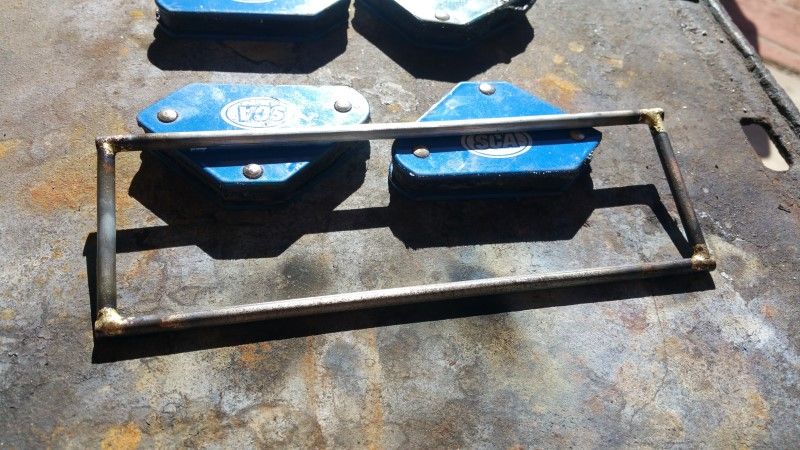
              I used a 8mm OD stock for the main hoop and rear bars. I tested a couple of options before committing to brazing.


              Once I settled on the design I broke out the map gas.


              Test fitting the rear section.


              Now for the front. Here I used 6mm OD stock. This looks like it will work.


              And this is just about done. I added a front cross bar and rear flat plates for the main mounts.


              I want to add a couple of grab bars and possibly some other mounting fixtures before cleaning it up for paint.


              Cheers
              H2Micr0
              Trailworx Garage
              Last edited by H2Micr0; 11-23-2017, 07:54 PM.
              sigpic

              Come and check out 'Trailworx Garage' on Facebook and Youtube

              Comment

              • H2Micr0
                Senior Member
                • Aug 2014
                • 140

                #8
                I made one final addition of some grab handles.


                Cleaned up ready for paint.


                Like the original FJ40 Shorty, the bar work will be silver.


                Sparkly.


                Liking the stance a lot.


                I wanted to provide some reinforcement for the windscreen.


                Why????


                I know that at some point this rig will be on its side, if not upside down. It is very unlikely it will be in a situation where it would have a large tumble though. The windscreen is only plastic, and being a heavy rig I wanted to help it stay where it should be.


                So I came up with this.


                It fits snugly inside the frame.


                I had to clearance the back of the dash a little but everything fits nicely.


                I used a CA rubberised Gel glue to bond the two frames together. We will see how well this works out over time.


                While I had the dash out I had a brainwave on how to make this a right hand drive.


                Stock dash.


                After some careful attention from the dremel.


                I then cut some new panels and glued them on. I had to clearance the door trims a little but it all fits just right.


                I will make up some new pieces for the instrument cluster, glovebox and a grab handle.


                I had started on the rear bar previously, but it just wasn't looking quite right.


                So I did a bit more chopping and now have this, which I think looks just right.


                Some scale bolts will be used for the final assembly.


                Cheers
                H2Micr0
                Trailworx Garage
                Last edited by H2Micr0; 11-23-2017, 07:56 PM.
                sigpic

                Come and check out 'Trailworx Garage' on Facebook and Youtube

                Comment

                • H2Micr0
                  Senior Member
                  • Aug 2014
                  • 140

                  #9
                  I made a nice green shape. I hope you like it.


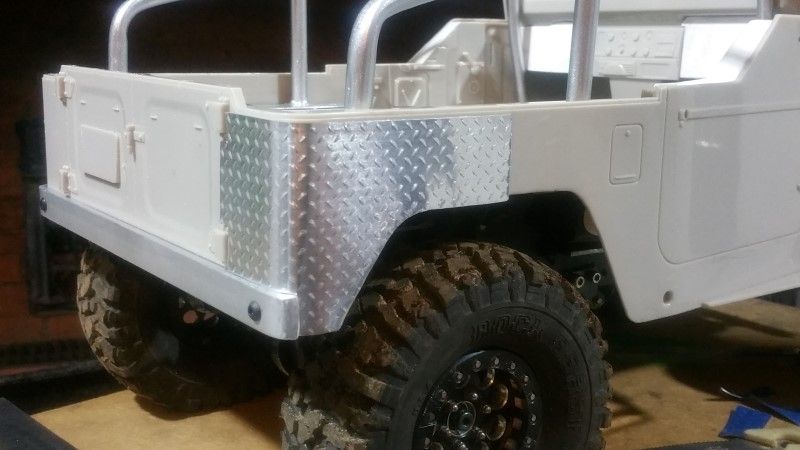
                  I used this to draw more shapes on this shiny bumpy stuff.


                  Which I then cut out, bent a little, and found it fits very nicely here on the back of the truck. Amazing!


                  It was then I discovered I had a bit of trimming to do on the other fender. They are not quite the same shape.


                  And the other side is sat in place.


                  Much approval going on here.


                  Being a trail spec rig, with a custom rear bar, the tail lights needed to find a home out harms way.


                  I used some scale bolts to attach the body armour to finish it off.


                  Next issue to deal with was some sliders.


                  I have considered a number of ideas from brazing up some barwork, to the door handle trick I used on the original FJ40 Shorty, but nothing felt quite right.


                  Then I spotted some of my right angle alloy stock that triggered a notion.


                  After a bit of chopping and drilling I had a working solution.


                  Using the original body mount holes it mounts firmly to the body.


                  BUT!!!!


                  The outer body has a fair bit of deflection to it due to this gap here.


                  To correct this I found I had some square styrene stock that fit snuggly in the gap.


                  I deliberately installed the slider protruding 3mm out and finished it off by rounding off the corners.


                  These should provide ample protection from rocks and allow me to make use of the sliders where needed.


                  Cheers
                  H2Micr0
                  Trailworx Garage
                  Last edited by H2Micr0; 11-23-2017, 07:56 PM.
                  sigpic

                  Come and check out 'Trailworx Garage' on Facebook and Youtube

                  Comment

                  • H2Micr0
                    Senior Member
                    • Aug 2014
                    • 140

                    #10
                    With all of the above done, the body was just about ready for paint.


                    I took care of a few things and seeing as the sun decided to come out got to it.


                    Primer done.


                    Then I went a bit wild with some bare metal and rust for when it gets scratched.


                    The final body colour is a Satin Poppy Red by Rust Oleum.


                    I don't plan on weathering this one as it is a fresh build. I may look at weathering it gradually though along with natural scrapes and scratches.


                    Hopefully I can get it assembled today.


                    Cheers
                    H2Micr0
                    Trailworx Garage
                    Last edited by H2Micr0; 11-23-2017, 07:57 PM.
                    sigpic

                    Come and check out 'Trailworx Garage' on Facebook and Youtube

                    Comment

                    • H2Micr0
                      Senior Member
                      • Aug 2014
                      • 140

                      #11
                      Sadly I have been home sick from work with the flu for two days, and the best remedy I can think of is time out in the Trailworx Garage.


                      I managed to put in a bit of time each day to detail and assemble this rig slowly.


                      I got to work keeping in mind the concept behind this build, which is an old FJ40 that has been refurbished and modified to create a capable trail rig while still being road legal.


                      The door trims got the treatment first. I used permanent markers for a simple but effective result.


                      Next I had to finish the dash. I made a gauge cluster using 1.5mm black styrene and 10 OD tube.


                      I cut two 3mm rings off the tube and then drilled and filed the styrene until the rings were a firm fit in the holes.


                      I shaped the styrene sheet until it had the desired shape and then attached it to the dash with 3 m2 scale bolts. I also fitted a grab handle i had laying around on the passenger side. A bit of detailing on the steering wheel and center dash area achieved the desired result.


                      I bolted in the spare tire mount and attached the rear quarter body armor and tail lights. The rear bumper was painted black and then attached with m3 scale bolts.


                      While I like this clean look, I will be adding a hitch and tow points to the bar.


                      I bolted on the sliders, sat the cage back in and installed the spare. The grill was blacked out and attached before sitting the body on the chassis to see how it was looking.


                      Yes, very happy with the progress.


                      One thing I was yet to do was the seats.


                      I had some custom made seats for 7" characters out of the F100 and as you can see, they are way too small.


                      So I made some larger ones. This looks about right.


                      Made out of thin alloy sheet and with self adhesive felt.


                      Much better.


                      The stock seating position of this body is actually way to far forward. The new seats will be mounted further back, but this created an unsightly area on the original seat base.


                      I covered this area with diamond plate to create a bit of contrast and to help break up all of the red.


                      the indicators were blacked out and installed and some minor detailing of the bonnet latches etc done. The windscreen rubber surround was also blacked out prior to the windscreen and wipers being put in their places.


                      A few scale accessories have been sat in place, which I will move around until I am happy. I MUST build some inner fenders for the front though.


                      But this is pretty much close to done.


                      Now my biggest concern is finding a driver that looks appropriate.


                      What do you think of Snake Plisken? He is 8" tall which is about the right size.


                      I hope you all like the finished look as much as I do. It does emulate much of the original FJ40 Shorty's design cues, which was part of the plan.


                      Keep watching for future mods, and I will be getting some photos and video over the next couple of weeks.


                      Cheers
                      H2Micr0
                      Trailworx Garage
                      Last edited by H2Micr0; 11-23-2017, 07:58 PM.
                      sigpic

                      Come and check out 'Trailworx Garage' on Facebook and Youtube

                      Comment

                      • H2Micr0
                        Senior Member
                        • Aug 2014
                        • 140

                        #12
                        After a rainy week here in Sydney Australia, the weather cleared nicely for the weekend.


                        Which was GREAT as it meant I could take the FJ40 Shorty out on it's maiden run.


                        On Saturday I added a puppy to the front passenger seat.


                        I also fixed all the scale items in place that needed to be locked down.


                        And the final part was to install the SHORTY number plates.


                        The rear was simply glued in place with some silicon.


                        The front needed a new bracket to be fabricated first.


                        On Sunday 4 fellow scalers joined me in exploring a location that was new to us.


                        We went to Shark Point at Clovelly, Sydney.


                        This turned out to be a great location with lots of scale terrain to play on.


                        Here is a selection of photos from the outing.


                        I am really happy with how it performed.


                        I have a couple of small improvements to make but nothing major.


                        I will say the metal reinforcement in the windscreen proved its worth during a slow rollover. Well worth the effort.


                        I will be getting some video during the next few weeks, and I still think a driver of a larger stature is also required.


                        Cheers
                        H2Micr0
                        Last edited by H2Micr0; 11-23-2017, 07:59 PM.
                        sigpic

                        Come and check out 'Trailworx Garage' on Facebook and Youtube

                        Comment

                        • H2Micr0
                          Senior Member
                          • Aug 2014
                          • 140

                          #13
                          Originally posted by Fourth Protocol
                          Very nice. And liking that reinforced winscreen - I've destroyed two windscreen frames in as many months.

                          I have now proved the value of this, as you will see soon.


                          Originally posted by wsd
                          Thanks for the info. His work looks great.

                          No probs.


                          Originally posted by mrmat01
                          Me thanks you to for info
                          The new drver has got me intrigued is it Luke Duke :laughing:


                          Thanks for sharing ::2thumbs

                          LOL, well done, you got it.


                          Originally posted by Rubostli
                          love it, I like what you dit with the tale lights!

                          Thank you. Needed to get them up and out of the way.


                          ************************************************** **********************************


                          I have just returned from my annual trip up to the Sunshine Coast in Queensland, which is around a 12 hour drive from where I live in Sydney, New South Wales.


                          Before I left I received the new Driver for this rig.


                          This is an 8inch figure, with quite detailed clothing that is just right.


                          I also addressed a small issue I had with the front servo horn. The tie rod would just touch it when the front end compressed. It would articulate fine left and right, but had limited movement when the whole axle moved up and down.


                          So I lifted the servo using some longer bolts and M4 nuts as spacers.


                          Much better as you can see.


                          The rear end also received a small lift to keep it even with the front.


                          I had almost two weeks in Queensland and I took 4 trucks up with me. I was able to make a few videos and will be releasing them over the next few weeks.


                          This is the first video of the FJ40 Shorty.


                          I also grabbed some still images from the video.


                          I hope you like the video and the pictures.


                          Cheers
                          H2Micr0
                          Trailworx Garage
                          Last edited by H2Micr0; 11-23-2017, 08:00 PM.
                          sigpic

                          Come and check out 'Trailworx Garage' on Facebook and Youtube

                          Comment

                          • H2Micr0
                            Senior Member
                            • Aug 2014
                            • 140

                            #14
                            Here is part two of the Kings Beach video.


                            Psssst, watch right to the end for a small rollover clip.


                            There will be another vid with Shorty and my HJ47 out together soon.


                            Cheers
                            H2Micr0
                            sigpic

                            Come and check out 'Trailworx Garage' on Facebook and Youtube

                            Comment

                            • H2Micr0
                              Senior Member
                              • Aug 2014
                              • 140

                              #15
                              I have published another video featuring the FJ40 Shorty, this time with the HJ47 Crew Cab.


                              What makes this video special is that my Brother and Nephew were doing the driving.


                              I had a great time sharing my love of scale driving with them both.


                              I hope you enjoy the video.


                              Cheers
                              H2Micr0


                              sigpic

                              Come and check out 'Trailworx Garage' on Facebook and Youtube

                              Comment

                              Working...
                              X